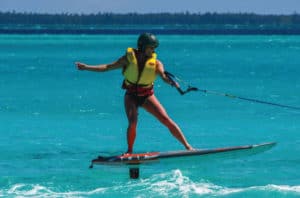
Kite foiling is a fantastic experience. Not only do you feel like you’re flying as you glide above the water’s surface; you are also able to utilise super light wind once you have the basic skills down pat.
First of all, it’s essential to get your head around:
- The mechanics of foiling
- How the wings work to generate lift; and
- How to control the foil board.
I will focus here on how to control the foil board when kitesurfing, however, to learn the actual mechanics… take a look at this short video to get you upto speed….
Now you are all up to date with the physics of foiling, it’s time to get into the fun stuff!
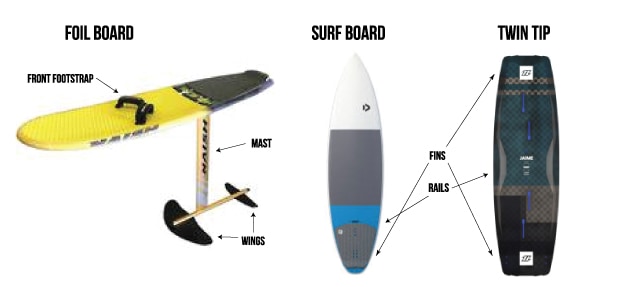
The foil board operates very differently from twin tips and a surfboard, which both rely on the rails and fins to steer. Instead, a foil board has a mast and a wing that goes deep into the water to give you lift and direction further down.
Once riding, you are required to use more front foot pressure to direct or turn the board in the direction you want to go, while simultaneously shifting weight forward and back over the front wing to control how high you go. It is a bit of a balancing act which can feel pretty twitchy at first. Once you relax, however, and start cruising, you will start to get your head around the required motions pretty fast.

FOILING TIP #1
I recommend that you start off by learning to foil behind a boat or Jet Ski; this will allow you to solely focus on the hydrofoil rather than trying to pair it immediately with a kite. Once you get our head around how the foil reacts to your motions, and have necessary control, you will find it considerably more comfortable to introduce a kite to the equation.
FOILING TIP #2
The best wind conditions in which to learn to foil kite are between 12 and 15 knots. I recommend using a big kite in light wind conditions, so you will have plenty of lift and support. This will help keep kite movement to a minimum, as we ideally want a steady pull without too much effort to make the learning process as easy as possible.
FOILING TIP #3
Use only a front foot strap! This will allow you to keep your back foot directly above the mast of the board – otherwise you will find it difficult to get the foil board to lift off the water. Having your feet in the correct position will allow you to ride the board flat across the water and get used to how the foil feels. Even before you raise up into the air, you will feel the pressure of the foil working underneath the water. Once you have the correct balance, it is time to move your front foot back a little and start lifting off the water!
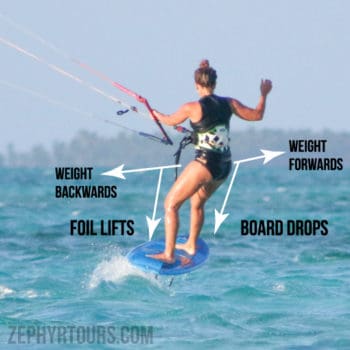
In most board sports, you instinctively put more pressure on your back foot, however, with foiling it is counter intuitive. Make sure you practice using more front foot pressure and slowly moving your weight backwards, putting more and more pressure on your back foot until you feel the foil lift underneath you. The instant you feel the foil board lift off the water, shift all your weight forwards again to try and get the board back down. Believe it or not, it’s often harder to get the foil back down then to get up!
 It is imperative to focus on this step. Getting the foil up and then instantly working to get it back down will speed up your progression. The reason for this is that you are trying to find a balancing point – which is somewhere in the middle – of shifting pressure between your front and back feet.
A common side effect of learning to foil is that you will often breach a lot. A breach is when the board is moved too high, and its front wing comes out of the water. When this occurs, you lose all of your lift, and will instantly drop back down to the water. If breaching continues, it is because you have too much of your instinctive back foot pressure! When you lift up, breach, and fall back down, it takes a second for the water friction to re-engage over the front wing. You will lift straight back up and breach again, and again, and again…
Direction is the key
When you first start to learn the foil, you want to try and ride directly across the wind with only the slightest edge. Stand with your weight straight above the board and do not lean back too much. Imagine riding a surfboard or twin tip flat, with your weight balanced on the board, rather than relying on the kite for support! This is a great way to start, as you won’t generate too much power and speed.
The next step to focus on is the kite and where it needs to be positioned in the wind window. While you are learning, try not to let the kite travel below 45°; keep the kite higher than 10:30 or 1:30 in the window. If the kite gets too low, it is likely that you will generate too much speed and quickly become out of control. In addition, you will lose the support of the kite. Keeping the kite high will help keep you balanced and stable on the foil. The kite position will also assist you to control your speed – the higher the kite is in the sky, the slower you will go.

Once you are starting to get some nice long glides on the foil, it is time to start directing the foil in a more upwind trajectory. This can be done in two ways:
- First, by steering the foil board using your front foot pressure, hips and core.
- Second, by angling the wing away from the kite, much like edging. Start to resist against the pull of the kite and drive the foil upwind.
I find the best way to start is by slowly sitting back into the pull of the kite to give you a stronger sense of stability. Start by bending your knees, then slowly add more pressure onto your heels. Bring your bum closer to the heel side rail of your board. As you start to do this, you will start to accelerate. If you feel like you are getting out of control and going too fast, bring the kite back up to 12 and you will slow down again. Keep practicing this until you are able to manage your speed using the foil, just like you would use your edge on a twin tip.
And that’s it – you are up and foiling.
Yew!
Now just like when you first learned to kite board, you will need to learn how to go both ways! Most people will first learn how to foil both in each direction on their heel side, which means the frustrating process of changing your feet around after each tack. If you are a twin tip rider, this might feel more natural.
For surf board riders who often ride toe side, this might not feel very natural. So, I recommend in that instance to start on the toe side edge and go through the same process as I have described above. Get up on the board, ride it flat, front foot pressure, and then slowly get up on the foil and direct the board upwind.

If you want to learn how to foil, check out the PROGRESSION PLUS tours, or to perfect your foiling technique and for more advanced foiling & freestylers, make sure you check out the Foil & Freestyle kite tour with Tom Hebert on the Cocos Keeling Islands.
Keep it Simple, Make it Stylish!


1 Comment. Leave new
Hey mate, beautiful post. I’ve been windsurfing and kitesurfing since 2005. Got the old C kites , the 5th line ones etc. I haven’t been able to practice much because I’ve moved to canberra for 6 years to get my visa =p but finally i got it and now im back in sydney! I’ve been finding heaps of info about how to foil and stuff but the problem I’ve been having is what size kite people use. On your post for instance, you said use big kites. But i guess depending where your from, what kites are normally used, it could very. Back home in south brazil my big kite was a 12 hahaha. The other day i went to north narrabeen on a 11m with twin tip on around 15 knots and was almost not doable you know what i mean. What would you say it would be the ratio for foil? as in 20 knots kite 10 on a twin tip. 25 knots kite 9 on a twin, 30 + kite 6.. etc
thanks heaps,
Erick